Introduction
Caps are very adaptable as things of attire. They can fill a reasonable need like safeguarding eyes from the sun or can be important for a work uniform. Furthermore, they can likewise be a design thing that can assist with making the wearer look much cooler!
Note: After learning this tutorial visit more Pencil Drawing Tutorial.
Regardless of the utilization, covers can absolutely come in every kind of various looks and styles. To plan your own cap, then figuring out how to draw a cap will be fundamental! Fortunately, this very guide will tell you the best way to do precisely that. Our bit by bit guide on the most proficient method to draw a cap will show you how simple and fun it very well may be.
Stage 1 - Cap Drawing
For this initial step of the aide on the most proficient method to draw a cap, we will begin with the layout of the body of the cap. To do this, we will involve a bended line for the foundation of the cap. Then, at that point, we will involve one more round line for the highest point of the cap, and this will interface with the base that you recently drew. It may not seem to be much right now, but we will add an additional subtleties to it in the accompanying advances, so presently you are prepared to continue on.
Stage 2 - Begin drawing the tie of the cap
A cap will ordinarily have a tie at the back that allows you to change its size so it will fit you better, and that is the very thing that we will attract this step of your cap drawing. To do this we will draw a little round shape at the rear of the cap. The shape will be genuinely lengthy evenly however very short upward. Whenever you have drawn this shape as it shows up in the reference picture then, at that point, you're prepared to continue on toward stage 3!
Stage 3 - Presently, draw a few subtleties for the cap
Next in our aide on the best way to draw a cap, we will begin adding a subtleties to the cap. We will begin for certain straightforward subtleties for the tie that you attracted the past part. You should simply add a few dabs to it to show where it would be changed. Then, at that point, define bended boundaries near each other up from the lash and to the side of the cap. This will shape the opening at the rear of the cap.
Then, draw a little, adjusted shape at the highest point of the cap. Then, we will broaden a few lines done from that shape for the various sections of the cap. Then, you can polish off this step for certain dabs in the upper segments of the cap. These will act as some ventilation openings in the cap.
Stage 4 - Next, draw a visor for the cap
Without a visor, a cap wouldn't precisely be extremely valuable or supportive! Thus, we will attract a visor this following stage. For such a significant piece of the cap, this ought to be one of the simpler pieces of the cap to draw.
Essentially expand a bended line from the left-hand side of the cap, as displayed in the worship picture. The highest point of the visor will be less bended, while the lower part of it will be more adjusted. Whenever you have drawn this visor, we simply have a couple of additional last subtleties to include the following stage before you variety in your drawing!
Stage 5 - Presently, you can polish off the last subtleties of your cap drawing
We will variety in your image soon, yet first we have a more modest subtleties to include this step of our aide on the most proficient method to draw a cap. In the first place, you can define a few additional adjusted boundaries into the visor of the cap that you attracted the earlier step. Then, at that point, we will add a few square shapes to the front of the cap for an identification or a logo there. With a couple of additional lines at the base, you will have completed every one of the subtleties in this aide!
Note: Visit the Early Childhood Education.
Before you continue on, you ought to go ahead and add any subtleties of your own that you might need. This is tied in with making your ideal cap, so you ought to adorn it anyway you please. You could draw a few cool logos, identifications or different frill for a couple of thoughts. You could likewise draw yourself wearing the cap on the off chance that you're feeling imaginative! What cool subtleties and additional components might you at any point consider to polish off this drawing?
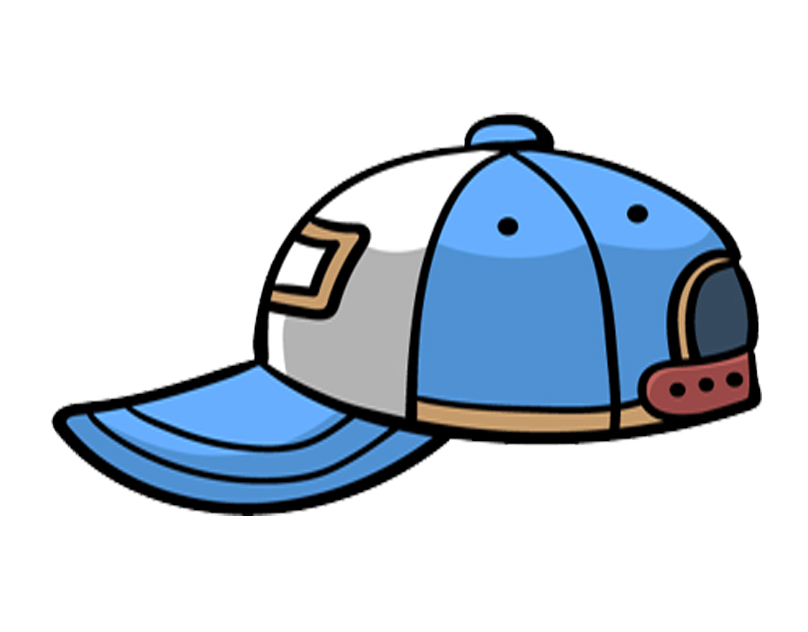
Stage 6 - Polish off your cap drawing with some tone
This 6th and last step of your cap drawing will be tied in with polishing it off for certain astounding tones! In our reference picture, we showed you the varieties that we would decide for this image, however you ought to go ahead and utilize any tones that you love to rejuvenate this picture!
Covers can come in any varieties you can envision, so you have a great deal of opportunity with how you can variety in this wonderful drawing. You can likewise explore different avenues regarding different workmanship mediums and apparatuses to assist with carrying your variety decisions to splendid life.